


Documentation. Love it or hate it, it’s an important part of building and running an efficient and effective business. Writing down the business processes enables team members to repeat work efficiently and consistently, without having to remember each detail or ask other people about how to do it.
A company with a culture of documentation can experience benefits such as
- Reducing stress of team members, the strain on your brain to remember how to do everything (especially if you’re “doing more with less,” a common theme in businesses right now)
- See, agree on, and improve processes
- Efficiently iterate and experiment
- Improve employee onboarding
- Attract and retain more talent, the ultimate result of building and maintaining this culture
If you want to experience these benefits, a good place to start is writing your first piece of documentation.
Before we jump into action, let’s take a step back and explain what exactly we mean when we say documentation for your business processes. There are several other common types of documentation, such as software documentation, which we are not covering in this article.
What is business process documentation?
Documentation is recording who, what, where, when, why, and how to do everything in your company or role.
AND
Storing that information in one place where other people can find it and use it.
Basically, documentation is any recorded information. Information that is not only located in someone’s head. If you need to have a meeting in order to get access to the information you need (by verbal communication) then that info is probably not documented, or the knowledge holder missed the “sharing” step.
It is sometimes referred to as Standard Operating Procedures (SOPs), business handbooks or manuals…the words process and procedures can be intimidating.
Let’s make it more relatable and easy to understand.
Documentation is content. Helpful content!
Documentation is knowledge sharing!
Eliminating knowledge gaps and knowledge silos.
Saving documentation where people know where to find it, plus communicating about changes and new items, is knowledge distribution or management.
Now that we know what documentation means in this context, we're going to cover these topics:
The content of this blog is from my workshop and course on documentation
If you like to take action as you read, I have a documentation writing workbook and template you can use as you follow along with the post.
Top 5 tips for writing process documentation:
The First Step: Writing the Steps
Technically the first step is deciding which business process to document. For my documentation course, I have an entire class session on prioritization documentation and a worksheet to help you get started prioritizing before class.
Let’s assume you know what you want to start writing about!
I recommend starting with a task you perform yourself. Otherwise, trying to investigate and collect the process information from different people will slow down your progress of getting started creating documentation. I want to set you up for success in getting started, so make it easy on yourself and choose a process you perform.
The first step in your documentation journey will be writing the steps.
Getting started
Don’t overthink it.
One of the key tactics to successful documentation is thinking of it as "living documentation" that is constantly being improved and updated as the processes are run and the processes change. The first draft is not going to be perfect. It is just a first step to get you started, so don't put too much pressure on yourself.
- Use whatever writing or documentation software is easier for you, for the first draft. It is tempting to spend hours researching the "best" writing or documentation tool first, instead of spending that time writing. Don't do this. You can always transfer the information to another tool later, or delegate that copy & paste work to another person. Getting the steps out of your head, or your team's heads, is a more difficult task to delegate.
- If you have a fear of the blank page, and you find talking easier than writing, record yourself talking through the process and then transcribe that recording into your first written draft of steps using a simple tool such as otter.ai. You can even use Google Meet or Zoom, if your subscription includes transcriptions. Keep it simple!
- If your process is software-based, there are also tools that can record what your mouse is doing as it moves around on your screen, and possibly transcribe as well. This can also help overcome the fear of the blank page and procrastination, to get you started documenting. A few tools include Guidde, Iorad, Tango, and Scribe. (Though remember: don't spend hours researching tools before starting any documentation drafts!)
Writing the ‘recipe’
You can think of writing a process like writing a recipe. What do you do first, second, and third in order to complete the task or achieve the outcome?
Thinking of the process steps like a recipe can also relieve some of that pressure you may feel when procrastinating documentation. Thinking about writing about making food for yourself, instead of thinking about how to do something you need to do to be successful in your job, can relieve enough stress for you to start a first draft of your process documentation.
Thinking of the steps of the process like a recipe can also help you think of steps you do automatically, but they are steps other people wouldn’t know how to do. It can help if you think of the process like physically assembling and cooking something as opposed to thinking about clicking around on the computer.
Recipe thinking also helps you with breaking the process down into small steps. Small, clear, manageable steps are a key part of good documentation.
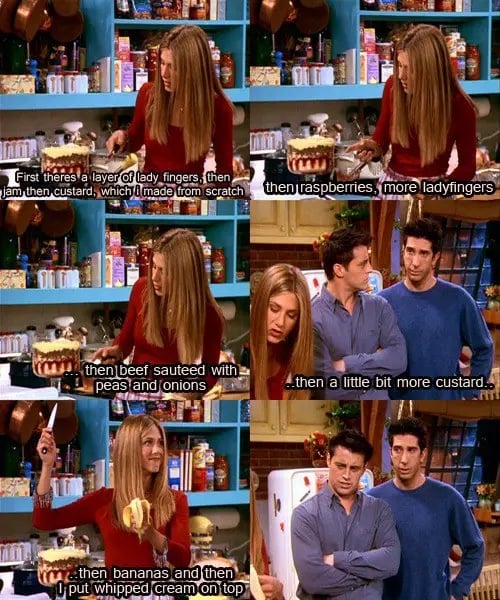
What can go wrong – if the recipe is not clear?
Melissa McCready, a course member and expert, reminded me of the below example of a recipe problem. It is the Friends TV show Thanksgiving episode where the cookbook pages are stuck together and Rachel combines two recipes.
If the recipe (instructions) is not clear:
- It is not performed consistently and the outcome changes each time, and when different people follow it
- People may get confused and give up and invent their own way of doing it
- It creates unpleasant surprises which are bad for the customer experience
You expect your favorite meal at a favorite restaurant to be the same each time you eat it.
If the recipe isn’t clear, then all the chefs can't follow it the same way, so you may be unpleasantly surprised and no longer have a favorite dish.
How to write clear process steps
Here are a few tips for writing clear steps, so you don’t create a badly-written recipe:
- Write with the user in mind, someone who has never done this before.
My change management friend Marliese Bartz said a good test is: Can an 8-year-old follow the process successfully? How about an 80-year-old? - Write the steps in the second-person point of view, using the word "you" to give instructions, not "I".
Do this, do that, not I do this, I do that.- This will help with inclusion and getting other people involved in editing
- If the process is new and you're not confident that the current steps are the best way to do it, using "we" may feel better, such as "sometimes we do xxxx for this step."
- Avoid using people's names since people may change roles. Use a title instead.
- Avoid any symbols, abbreviations, or jargon that other people won't understand.
- These create a burden for the reader and create inclusion & belonging issues. People won’t feel like part of the culture or team if they don't understand each other.
- Think about what triggers the process to start and end, and add those as steps or as context before and after the steps
Example
Here is an example of simple steps of a process or task, for how to have a client kickoff call at an agency.
- Sales will break the ice a little and then introduce the Strategist to direct the rest of the call. The rest of these steps are performed by the Strategist.
- Start the call by greeting the new client and managing expectations for the call
- Discuss the products/services purchased, including training, if purchased.
- Explain and show the project management system and when they’ll learn more about it
- Show the running meeting notes and how to find them
- Explain when to use each communication method
- Talk through they customer journey
- Discuss their goals for the next 90 days and 1 year
- Discuss their needs/priorities and the use case planning sheet, if they have one
- Set up all weekly recurring meetings
- Discuss the timeline of the projects or most important tasks.
- Recap the action items and next steps
- Thank the client and end the call
These steps are probably more detailed than your first draft, but getting that first draft down on ”paper” is very important. The above steps could also benefit from linking to more information, such as an agenda template and other related documents, as a later step to improve the documentation.
User testing the steps
It's hard to know what you don't know!
Make sure to have a peer or colleague review your steps after editing 1-2 drafts on your own, after you perform the process and add the steps you missed writing the first time.
The first reviewer doesn't need to be the person who actually does the task. In fact, it may be better to ask someone unfamiliar with this process to test your steps. That will help the steps be clear enough for training a person new to the process.
The reviewer can comment on the document or use any other text review method you prefer, adding their questions and comments to help you improve the document.
To see an example of the importance of testing the process steps, watch this video of an ops-minded dad asking his kids to write instructions on how to make a peanut butter and jelly sandwich.
Kristen Kelly, one of the people who took my workshop, also completed this challenge with her daughter. See it here.
Next steps: Naming & Structure
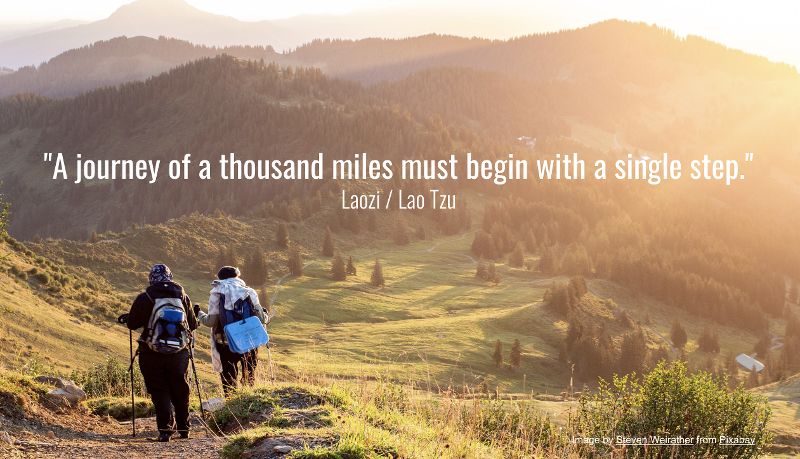
We started the blog with a deep quote about starting your journey with a single step, with an image of hikers at the beginning of the trail.
Now we’re continuing on your journey with navigation, so we can help everyone find the documentation they need and find the information they are looking for inside that documentation.
We do that by providing naming standards, structure, and other standardization of the documentation.
This is similar to giving users a map and a compass, as well as road signs or trail signs to help everyone find the information they need.

Naming
When we’re thinking about finding the documentation that you or your team has created, you can think of it like walking or driving to find a building or house.
It's much easier to find your destination when the streets are named and ordered logically on a grid, as in certain cities like parts of New York and downtown San Diego, for example.
We want to make it easy for the users of documentation to find where they need to go,
We don't want people to get frustrated or confused when they are looking for documentation, for them to give up on their journey to use documentation!!
Let’s help them get to their destination by making the documentation names clear.
By name, I mean the name of the file, the title of the documentation, or the title of the article.
Why are naming conventions important?
Standardizing the naming is important so people actually use the documentation, they are more likely to adopt the documentation habits.
They aren’t going to use documentation if they can’t find it.
So use naming that everyone understands and can easily search or navigate to find.
Also, creating the name is often the first step people think about when making new documentation. If you want other people to join you in creating documentation, make it very clear how to create a good name. Make the naming process easy, so there isn’t a roadblock preventing anyone from starting the document because they don’t know what to title it.
Here is one suggested naming format you could use:
Starting every document with “What is” or “How to” is a helpful constraint for thinking of a naming convention.
Or thinking about naming the document as a question people are asking, similar to many people’s Google searching habits.
Example: How to write documentation for your clients
Example: What is our budget approval process?
Or if you need to include the department name in the file name:
Example: Marketing: How to create a content calendar
The question format, or ‘how to’ format, also helps the writer really think through what they are trying to teach someone in this document.
A few more tips for naming documentation
- Similar to blog writing, you may want to quickly draft 5-10 names for the piece of documentation, to get your mind started working.
- Be clear. Ask several people what words they’d use to describe the process or instructions. Include those words so the document is searchable/findable.
Structure
Next, in our journey analogy, say someone is on their journey and they found their way to the building they were looking for.
They arrived at their destination. Thankfully, they had a good map, or the streets were in a logical grid with logical names.
In this analogy, they found the piece of documentation they needed, their destination.
But will they be able to find the room or location inside the building?
Will they be able to get what they need from that inside the building?
Meaning, can they find the exact info inside the documentation they are looking for, to answer their question?
The document structure is like the interior layout and signage inside the building, directing people to where they need to go.
Keep the structure standard for every piece, so people can quickly find the info they need within the piece of documentation, no matter which piece they are looking at.
Table of contents
Now we have the name on the top of the document. What comes next, on the document?
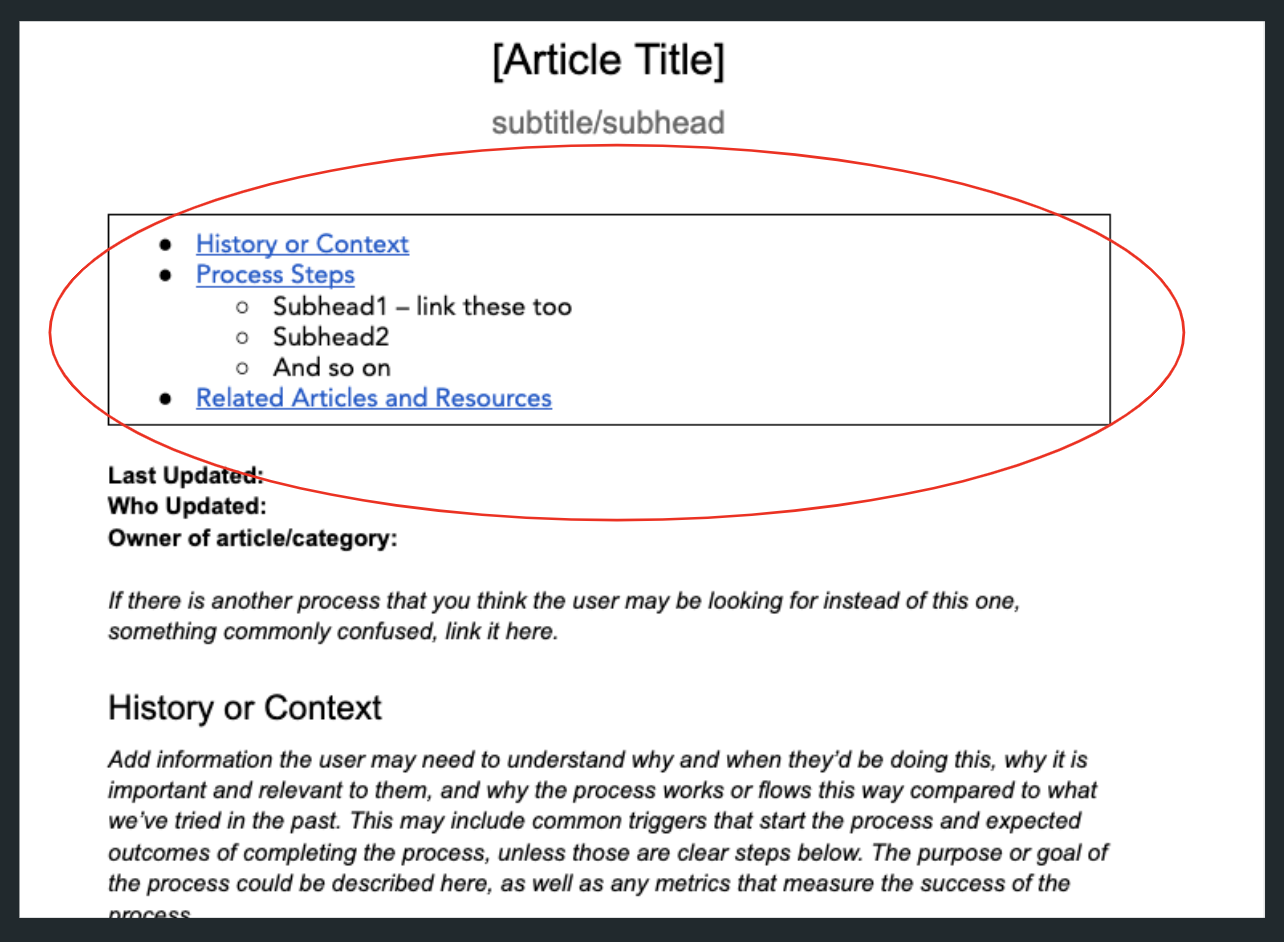
I suggest you add a table of contents, which links to scroll down to other sections and steps of the document. See an example on the template screenshot below. You will come back to this section later in your editing process, to finish adding or editing the links.
In Google Docs, this is possible by searching inside the link tool, or using the Headings and Bookmarks part of the link tool if you are using subheadings for the important sections and steps of the process.
In a wiki or web-based documentation storage tool, this is usually possible using anchors next to the text to scroll to, and linking the table of contents to the anchors.
At Remotish, we used a colored callout box for this, using HubSpot's knowledge base. See a public example here.
Why is this table of contents important?
- Encourages people to refer back to documentation more than once, by making it easy for them to find the exact section of the process they are doing or questioning or need to update –= encouraging user adoption & editing
- Allows you to add links to messages or other articles leading directly to the relevant subhead
- Subheadlines (H2, H3, H4…) are helpful for reading and interpreting the article faster than a heavy block of text – encouraging user adoption
- Requiring the subheadlines for a second purpose makes the writer more likely to use them while writing
Interior sections
The next structure topic is the recommended interior sections of your document.
You can see these sections in the template (which you can now buy outside of a class). Note that you can edit this template, to add or remove sections that are more relevant to your business.
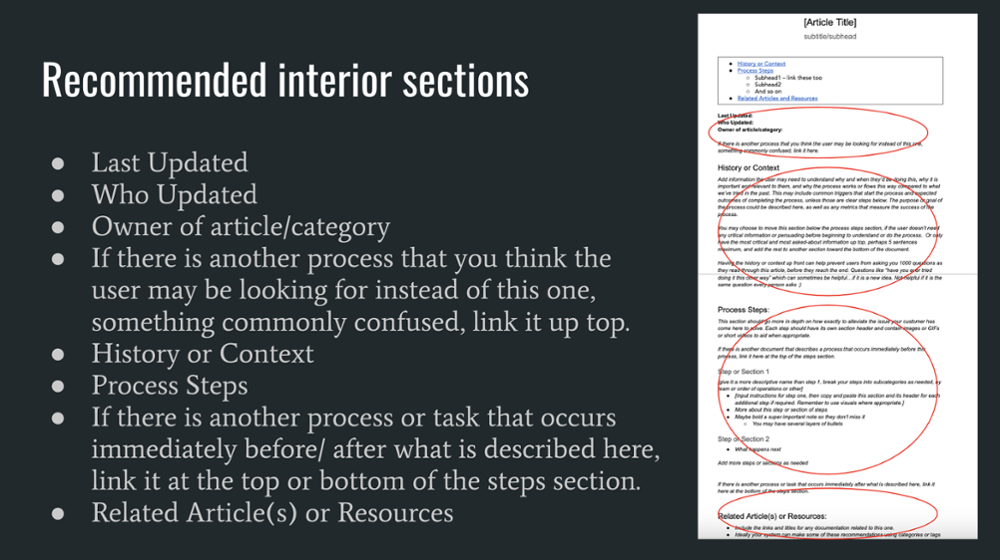
General recommendations to include in your template:
- Last Updated (system/tool may show this)
- Who Updated (system/tool may show this)
- Owner of article/category – who is in charge of approving changes to the process or who to ask questions
- If there is another process that you think the user may be looking for instead of this one, something commonly confused, link it up top (Onboarding, for example, could mean onboarding clients, onboarding employees, a product or service called onboarding...)
- History or Context (people can use the table of contents links to skip this after reading the document the first time)
- Process steps (the main section of the documentation)
- If there is another process or task that occurs immediately before/ after what is described here, link it at the top or bottom of the steps section
- Related Article(s) or Resources, what the users can look at next for more information
Why is it important to have a template of recommended sections that you and/or your team can use?
- A template makes it easy for users to find information in different articles; they know where to look. This encourages user adoption.
- A template removes barriers to creation, by giving people a template to fill out instead of starting with a blank page
- The top section of the template gives users the information they need, such as when the article was last updated and who updated it, so they know it is the current process or who to ask
- The bottom section of the template, recommendations, encourages users to look at other documentation if this document didn’t answer their question
Formatting
Here are a few more tips about formatting your documentation
- Use bolding and heading hierarchy to visually separate the info, making it faster to read.
- Use bullets
- Use callout boxes or insert colored tables to visually show important info. See example.
- Use short sentences
- Use simple language and no jargon (yes, I am repeating this one!)
- Add your culture into it if possible, without jargon, such as using emojis. If the document is less boring, it is more likely to be used.
- Consider linking the article to alternate formats, such as a checklist/spreadsheet, meeting agenda template, research template, or project management task template, when it makes sense.
Information still in progress
Since we’re talking about structure, there may be sections or parts of the process where you don’t have all the information yet.
That is OK!
Your document could start as a skeleton with one section filled out a bit, and the rest of the sections say “coming soon,” or "in progress, or similar language.
Every time you perform that process or task, you can add to the documentation, a bit at a time.
Adding in-progress languages makes documentation more manageable and not overwhelming. Remember that it’s a living document, so you will be making changes and edits frequently. Seeing you make changes often will also make other people less afraid to edit documentation, when you start to get other team members involved.
I like to use brackets to note this temporary information, and for notes or questions for myself to look into.
BUT don’t make ALL of your documentation "coming soon!"
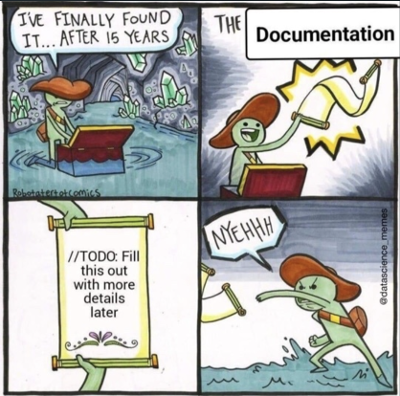
Fill in the document a little bit and make yourself a task to come back to it! So you don’t end up like this graphic!
Thanks to a documentation workshop class member, Jasmine Powers, for sending me this meme!
Conditional -- if/then steps
The final structure topic is conditional if/then decision paths, when a process changes depending on a decision made at a certain point. Similar to a Choose Your Own Adventure book, for anyone familiar with that series.
To solve this, you can tactics such as:
- Use the anchor links, similar to the table of contents, to link down to the A or B section of the document
- Or link to a separate article to continue the process for A or B
This may be a good reason to create a process map to insert in your document, showing the split choices visually. See the “parallel” example here.
Third step: Visuals
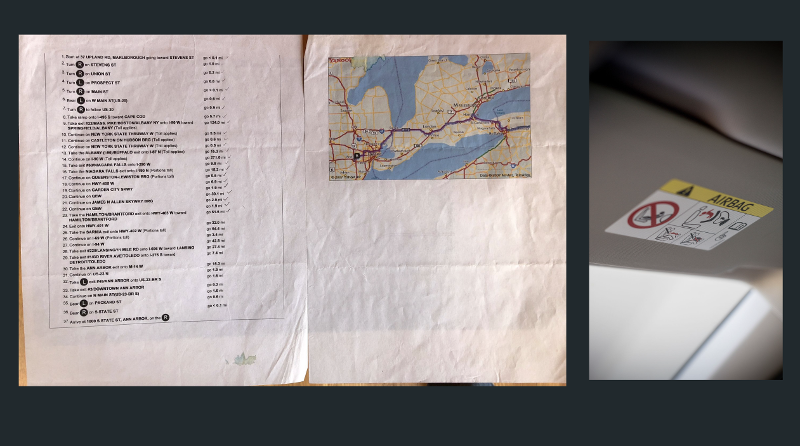
In the examples above, sometimes the steps by themselves are not as clear as when they are combined with a visual. For example, the map photo, along with the navigation steps, shows the journey more clearly than just reading the steps. Or physical instructions, such as the airbag safety tips, are easier to comprehend in a shorter amount of time across languages. Different people also learn better in different formats, so only relying on text won't create the best documentation that is likely to be adopted.
Examples of visuals:
- Flowchart
- Video
- Screenshot
- GIF
- Charts and graphs
- Infographic
- Embedded slideshow
- Emojis
- Images
See more details and examples for adding visuals in this blog post.
If visuals or multimedia are so important, why do I teach the writing part first?
- Generally, text can be the best format to start with because the editing is easier than video editing or flowchart editing. There is no special software or special skills required.
- But...start with the format easiest for you. As mentioned at the beginning of the article, if audio or video is easiest to help you get started, use software such as otter.ai to transcribe it into written text so it is more searchable and skimmable.
- Audio and video are hard to quickly skim to find the one piece of info a user may need within a document, so make sure to also add steps written in the text when possible.
- Text can be easier and faster for translation or allow for greater understanding from users who are not native speakers of the same language, though audio translation software is helpful for audio/videos.
I also recommend the visuals be added to documentation as one of the last steps in the creation process, since the written steps are often needed first to decide which step would best be displayed or illustrated using which type of visual.
I don’t recommend trying to write out steps and thinking about visuals at the exact same time. That can create a lot of internal task switching from words to visuals, which can make your brain tired. So drafting one method or format, then adding the other format, can be less overwhelming when creating documentation.
Final step: Putting it all together
Congrats!!
If you've followed all the steps above, you've finished a great version 1 of your documentation!
I would recommend user testing it again, and then your company can start using, sharing, and updating it.
Look at the happy people below, who are so excited that their documentation drafts are complete!

Additional help
You don't have to take your documentation journey alone.

More ways I can help:
- For the most help in starting or improving your documentation, I have a 2-week, 4-session live course which is offered quarterly, and a new on-demand version of the course.
- If you're not ready for a course yet, the workbooks and templates from the course are available for purchase.
- A lot of the course topics can be fund in this guide to documenting your processes
Other resources:
Topics: Documentation