Expanding on the post about how to write a business process, a key ingredient for any recipe, or process documentation, is adding visual or multimedia elements.
Instructions become clearer when the text is combined with a visual. Visuals and multimedia increase the accuracy and consistency of the process being performed and decrease the number of questions people will have about how to do the work.
Different people also prefer to learn in different formats, so text-based documentation is less likely to be as useful or as adopted as multimedia documentation. For example, my preferred learning format is reading or writing since I need to see the words on the page or screen in order to process and retain information. It's why I take a lot of notes when I have to watch a video or listen to a meeting, and it is one of the reasons I became interested in documentation. I realize not everyone is the same as me, so I use additional formats to make documentation useful for more people.
A video can be more useful for people who process information by seeing someone do the work or who prefer hearing someone explain how to do it. If the documentation contains more than one format to learn the information, it is more useful, so it is more likely to be adopted, which solves another common challenge.
I usually recommend starting your documentation with text since it doesn't require any special tools like video editing software. But if you're a verbal processing person who procrastinates writing, another great way to start is by recording yourself talking on audio or video, and then transcribing it. Just make sure that text does appear in the final documentation in some way. Text is easier, faster, and more accessible to edit compared to video or audio formats. If your main documentation challenge is convincing people to update it regularly, keep that in mind. You can see a few more reasons for creating text documentation in the previous blog.
Types of documentation visuals or multimedia:
The content of this blog is from my workshop and course on documentation.
Flowcharts / Process mapping
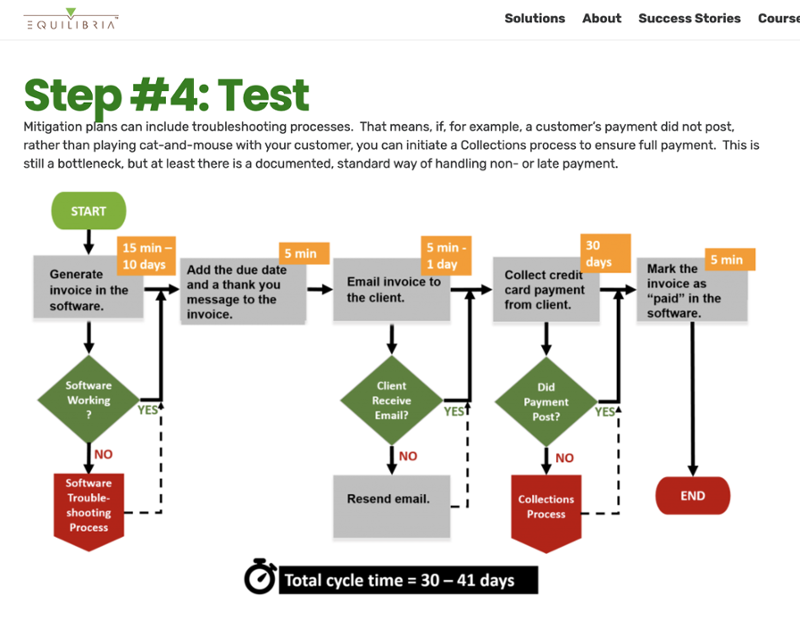
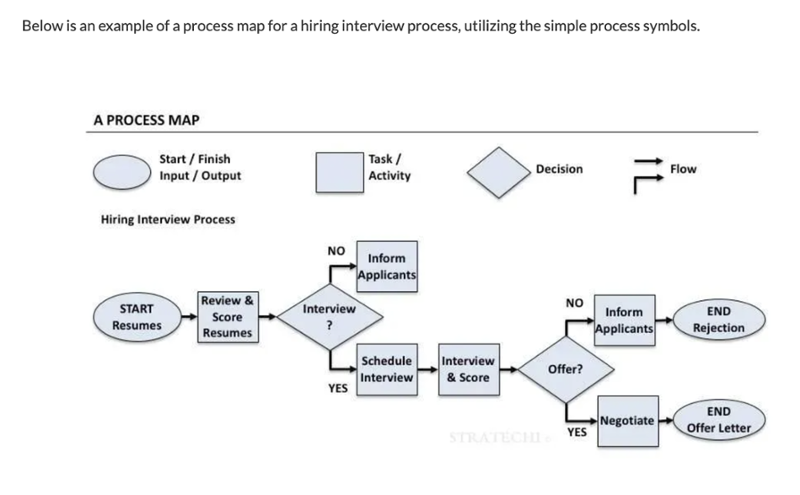
Flowcharts or process mapping is often the next step after you’ve written out your step-by-step documentation, turning all the steps into a flowchart. This visual is often used for process improvement. Combining written instructions and a broad overview process map in one document, or linked together, can also be helpful for people to see how their individual tasks fit into the larger business process.
Sometimes a flowchart may be created before the detailed instructions if you need to see and agree on the larger picture of the overall process first.
Examples:
Equilibria shares examples from building a process map:
Stratechi shows several technical examples of process maps:
Read more about process mapping from Lucidchart.
When to use flowcharts/process maps
- For getting many people to agree on the larger, broader steps of a process when it is currently being performed in many ways or when you need leadership approval to make changes to a process
- It can also show where the bottlenecks are in the process, the pain points, and danger zones, such as handoffs of customers from sales to customer service
When not to use flowcharts/process maps
- If you need detailed steps of exactly how to do the work
- When software steps need more visuals of specific items, such as where to click
- For shorter tasks or processes where illustrating is inefficient
- When learning the mapping symbols or software is a barrier to completing any documentation (procrastination by over-researching or learning about tools is a common pitfall!)
This Illustrative process mapping technique is not included in the documentation course, though it is discussed and demonstrated in the HubSpot Academy RevOps bootcamp I co-created and co-teach.
Screenshots
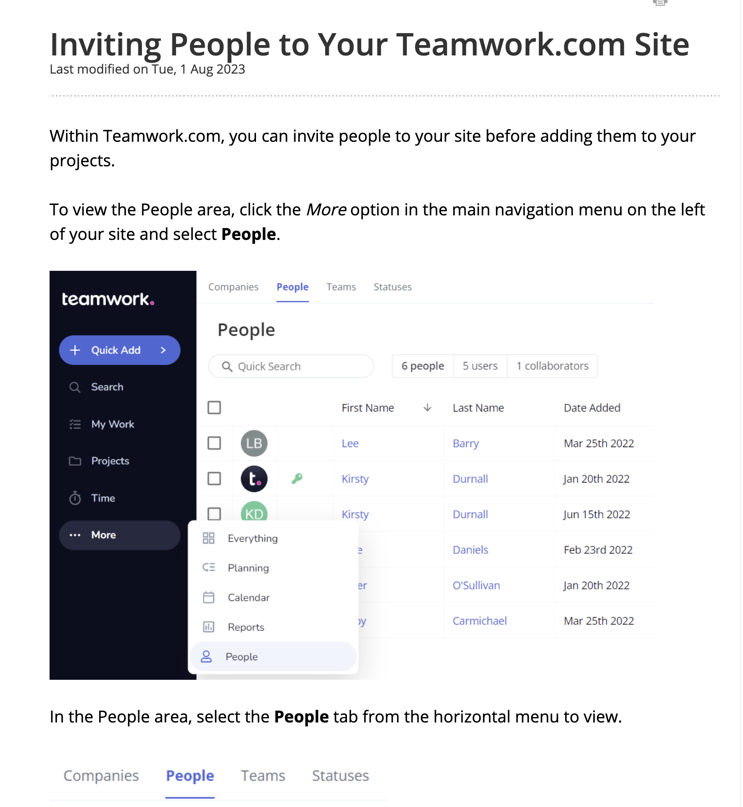
Adding screenshots to documentation can be helpful when the process is completed inside of software. There are tools such as Guidde, Iorad, Tango, Scribe, or HubSpot's Guide Creator that can help record and tie together multiple screenshots into videos or gifs (which would fall into the video or gif section of this blog). Note that tools can capture what you’re clicking on and where, but they cannot capture the context behind WHY the process is done that way, the goals of the process, or what you’ve tried before – those will still need to be manual additions to your documentation.
Examples:
HubSpot knowledge base article showing screenshots
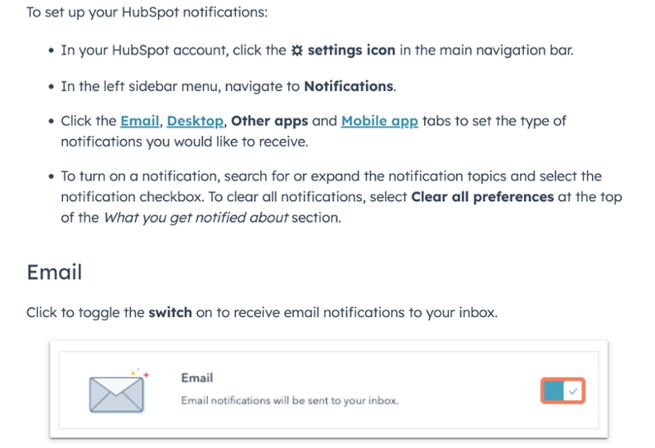
Teamwork knowledge base article showing screenshots
When to use screenshots
- If showing where a button is on a screen is easier to understand than using several sentences describing what to do
- If only a few screenshots are needed to better illustrate a few of your instructions
When not to use screenshots
- For more complicated instructions describing detailed steps in tools – a short video may be better than 30 screenshots in a row!
- When people use different devices to perform the task or process and the UI is different – be aware of this challenge
Video
Videos are many people's preferred method of learning and understanding. Make it clear in your documentation if the video is simply a different format of the text, or if it is additional information not found in the text. Speaking from personal experience, it can be very annoying to watch a 5-minute video if it's the exact same information as 30 seconds of reading text. Annoying people, or making them feel you wasted their time, is not a good strategy for getting your team to want to use your documentation. Overall, video, such as a screen share walkthrough of the process, is a great addition to documentation.
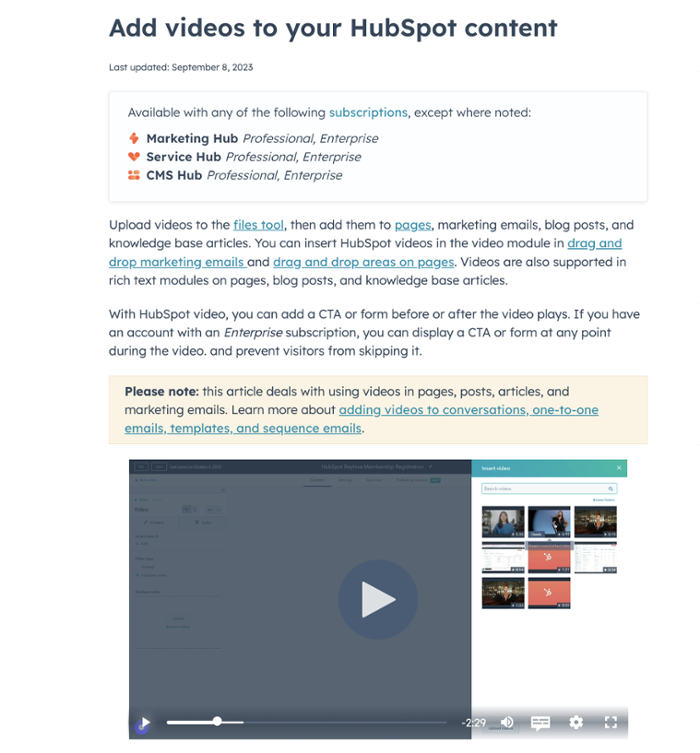
If you can embed the video within your document instead of just linking to the video, this removes a step for the user, and they are not clicking off somewhere else and getting distracted from finishing reading the documentation.
Examples
Embedded video in a HubSpot knowledge base article
When to use video
- When showing how to use software, it can be helpful and easier to create a screenshare video instead of 30 screenshots
- Especially if you can generate captions so people can read along
- For people who don’t love writing, video may be a good way to capture the information of the process as you do it, then transcribe it. Use screenshare capturing tools like Loom, or simply a recorded meeting tool such as Zoom or Google Meet.
When not to use video
- When you are showing processes or tools that change often, either a change in steps or a changing UI
- So you’re not constantly re-recording or learning how to cut and paste video edits (text edits are generally faster than video edits)
- Unless you break it up into short videos of 1 minute or less, that are easier to re-record and replace often
- Though tools such as Guidde can help by allowing you to easily edit the steps in the middle of the video
Videos are powerful additions to documentation, though be aware they can require more work for the documentation creators and maintenance teams:
- If your documention heavily relies on videos and your processes change often, that could cause problems with the users of the documentation knowing if it's up-to-date and trusting the documentation is correct.
- It could also create a burden or shortage of users who are able to edit your documentation, depending on their video editing skills. See more about documentation roles in this blog and consider if your creators, editors, and owners need video editing software and training.
- If your team is in the habit of searching for videos instead of searching in your knowledge base or documentation folders for the documents which contain the videos, you may need to collect and centralize all your company's instructional videos in one file storage location and one tool. (You may have already centralized your text documentation, so don't forget about videos, too!)
- In many companies, everyone in the company uses a different screen capture video tool and/or a personal account where no one person has access to all the videos that exist. This creates many floating links to videos, with varying permissions, so there is no real library of videos that is searchable or discoverable for instructions someone needs. It could also be difficult finding the original, downloadable video if you need to edit it when the process changes or the software UI shown in the video has changed.
Other visuals
A few other options for visuals to add into your documentation:
- GIFs – there is software that captures the process steps for you and turns it into gifs (or videos) to embed into the documentation, such as Iorad or Tango
- Example from HubSpot's knowledge base, scroll down to the IMAP section
- The funny type of GIF, meme, if humor is part of your culture. It helps break up the text.
- Charts and graphs
- Infographics
- Slides (embedded)
- Images
- Emojis - such as replacing bullet points with emojis
Adding notes to your documentation about upcoming visuals
I recommend adding visuals as one of the last steps of creating documentation, before testing. The written-out text steps are often needed to decide which step would best be displayed or illustrated, and then decide on which type of visual to use.
I don’t recommend trying to write out steps and think about visuals at the exact same time. It takes a shift in your thinking, thinking about writing steps compared to thinking about illustrating/showing them. That switching back and forth from words to visuals can make your brain tired. Drafting one format, then adding the other format, can be less overwhelming.
Another way to make adding visuals less overwhelming is to add in-progress language as a first step.
Add notes to your documentation describing the visuals you want to add:
- Where to add it
- What to add
- How to create it
- Who will create it
Example detailed note:
- [Add a 1 minute or less video here showing steps 1-8 in the tool. Make sure to highlight the exact button in step 4. Embed the video in this spot. Jen to use Loom to make this by 12/23]
If that is too much information for your first draft, try one of these shorter note examples to get started:
- [Add screenshot}
- [video coming soon]
- [flowchart will be linked or embedded here]
This note-adding is a good in-between step as you work on creating these images.
That will ensure the visual collection/creation process does not create a roadblock or additional procrastination before publishing and sharing your document. Your team can start benefitting from the documentation, or testing it, while you improve it by creating and adding visuals. This strategy helps break up the sometimes overwhelming task of creating documentation into more manageable steps.
Remember: You don't have to take your documentation journey alone.
Additional resources
- If you only want help with creating/writing documentation, I have a live workshop based on that course session.
- If you're not ready for a course yet, the course workbooks are available for purchase.
- Many of the course topics are also discussed in this guide to learn how to create business process documentation.
Topics: Documentation


